Instructional
Camera Phone Photography Tips For Models

As an online model, you need to market yourself. Aside from doing so on the platform, you’re currently using (hopefully this one), you’ll need to take pictures. More often than not, the most convenient device for snapping these pics is your phone. Camera phone photography can be so good that at times, it’s hard to distinguish from photos taken with professional equipment. Understanding how to obtain that high-quality and create content that captures the consumer is crucial.
Why Good Camera Photography Matters & The Basics
Chances are you’re posting socially or maybe you have your own website. If so, and regardless of where it’s being distributed, creating solid high-quality content is a must. Whether you’re posting media on your own site, your model profile, Instagram, Twitter, or any other social platform, you need good-looking content.
Why does it ultimately matter? It matters because it’s a direct reflection of you and your brand. For example, have you ever scrolled through Facebook or Instagram only to come across someone’s food post which they’ve shared with self-praise, only the photo makes you lose your appetite? While it might taste great, if it looks terrible, no one will find it appetizing. The same goes for other types of media.
Simply put, subject aside – good photography makes a difference.
Below you’ll find some of the most important things to understand when it comes to creating imagery with your phone. These pointers are applicable for those using Android and iOS. What’s also very important to understand is that regardless of the device, the basics of photography do not change. A lot of it boils down to light, subject, and composition. But first, cell phone basics…
Here are a couple of things that you need to know about the basics of cell phone photography:
- There’s typically a fixed focal lens which cannot be changed out
- Your camera comes with a camera app but more advanced camera apps can be downloaded
- There are lots of different things that you can control from the basic camera app
- You don’t really need to change most of the features you can control from the camera app to capture a good shot
More Specific Camera Photo Taking Tips
Before you start messing with all the features shown in the screenshots above, take a few minutes to read about some specific things that might enhance your shot…
The Rule of 1/3

This is a fun one and in my opinion, it’s what makes a lot of those travel photos pop on IG! The Rule of Thirds is pretty basic but a must-know for models. The rule is that the subject should appear off-center. Having the subject off-center leads to a more natural result (without trying so hard). Think about it this way, simply slice up the area you’re capturing in thirds and put the focal point aka you in the right or left “third” of the shot.
Simplicity

Remember to focus on keeping things simple in the frame. Keeping the distracting elements out of the shot is important. If consumers are able to quickly pinpoint the main point of your photo, the better and the quicker they understand the point you’re trying to get across. Take a look at your social media feed on Instagram. My guess is that those most liked are the simplest that get the point across. Just keep it simple.
Good Lighting

If you’re filming indoors, you’re going to want to consider the same advice that I’ve provided for the lighting of your cam room. If you’re incorporating natural light, then you need to be careful. If you’re incorporating natural light, then kill the electric lights. Feel free to incorporate the use of a reflector as well to bounce the natural like back on to your beautiful self.
The Golden Hour

Not sure what the golden hour is? It’s the first and last hour of light in the day. It’s pure magic and a great time for photo opportunities. The golden light is typically very warm and glowing. When shooting during this timeframe, you’ll be able to produce a softer, warmer photo with far less contrast. If you’re looking for tips on when the perfect time is for shooting during the golden hour, then you should download the Magic Hour app. This will tell you when to bust out your camera and start clicking.
Focus
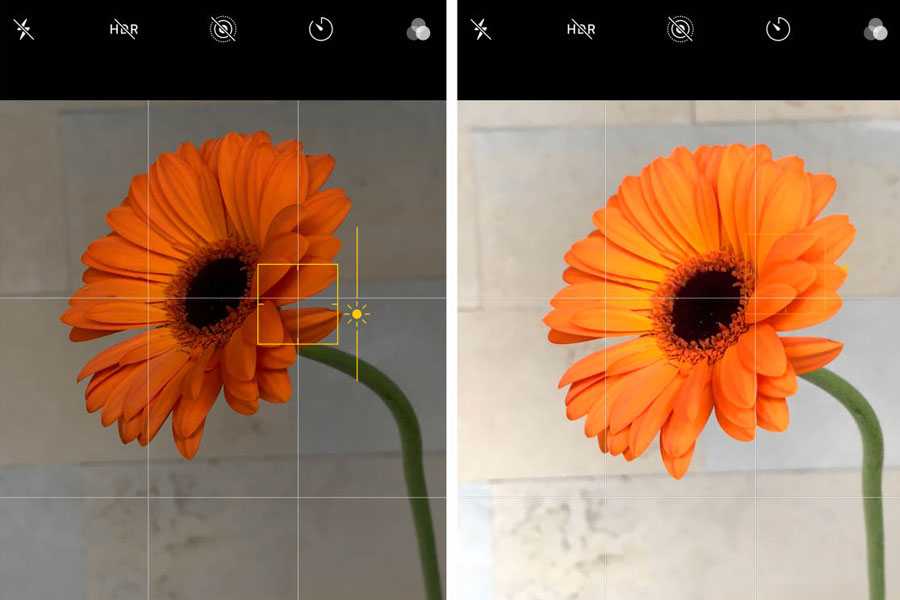
Focus is important as it will help you focus on a specific spot of a shot and this can be done very easily with a mobile camera. For iOS users, all you really need to do is tap the spot within the frame that you want to focus on and the auto-focus feature will handle the test. For the most part, without getting too technical, you just want to make sure that the primary area is in focus and if not, give it a tap to adjust things.
Aperture
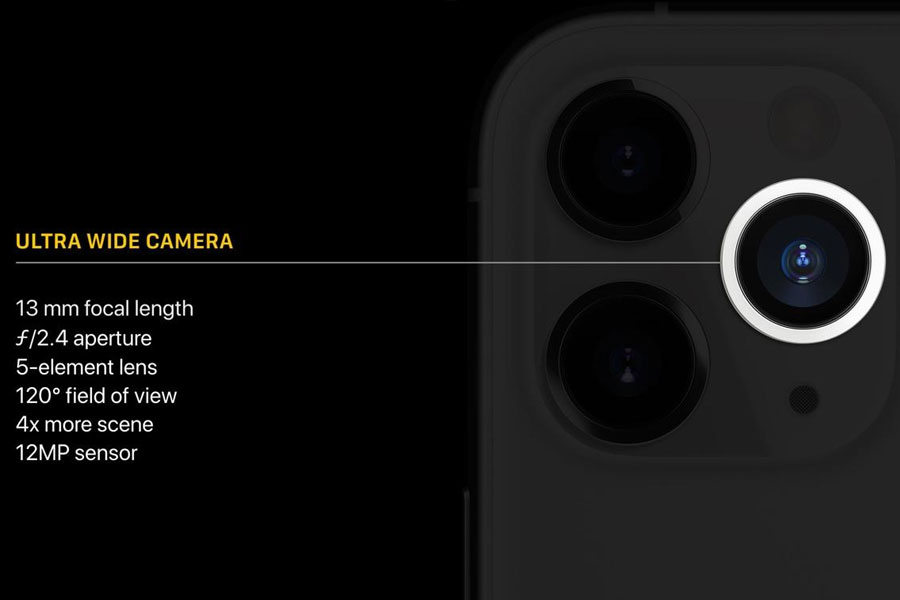
If you don’t know much about aperture, what’s probably most important to understand is that a mobile phone camera uses a wide aperture between f/2.0 and f/2.4. The f/2.0 aperture will transmit more light. Sometimes you’ll want more light, other times you may not. This is a feature that you’ll need to work with based on your background and setting if you’re using a mobile camera.
Bokeh

According to Nikon, Bokeh is defined as “the effect of a soft out-of-focus background that you get when shooting a subject, using a fast lens, at the widest aperture, such as f/2.8 or wider.” Basically, this gives you that cool out-of-focus blur effect that you see in many photos today. Photos taken with this effect are very cool and they can lead to lots of likes on social media. In order to achieve this, you’re going to want to download an app like the Bokeh Lens for iOS or the AfterFocus app for Android.
Color Contrast

Using a contrasting color in the photo will make things really pop and stand out. Doing so will definitely make your messaging stronger, whatever that might be. This is an easy technique to work into photos. You can do this by making sure your background and objects in the background are darker with a brighter focus on what you’re wearing or a brighter focal point.
Filling The Frame

This is a concept where you basically move closer to focus on the subject. For example, if you want to focus on a face or body part, you’ll want to get close, closer, even closer to remove any distractions and target the subject more.
You can even take things a step further and crop the photo. Just make sure you don’t reduce quality by doing so. What’s cool about this type of shot is that it allows you to get really creative with closeups and make your readers guess with what the images are. You might post one filling the frame followed by the full picture.
Conclusion
These are just some of the things that can help improve the photos that you’re creating to either sell via Camsoda or to post socially. I recommend messing around with things. Try experimenting with different effects as well as apps and see how your photography progresses. Whatever you do, as I’ve said before, don’t go wild with the filtering. Don’t get discouraged if you all of the sudden are not an expert overnight. Things take time and as always, if you have any questions, please feel free to reach out to us!